






Enough of COVID...what are you doing to the house?

Help me settle an argument with dad GTAM brain trust...

Planning on building a 10x11 or 11x11 gazebo / pergola at the cottage in the fall.

Dad opinion:
- post MUST be embedded in the concrete footing to be good

MP opinion:
- post CAN be placed ABOVE the concrete footing on brackets to prolong life and still maintain rigidity

Which of us is correct?

Plan is to use 6x6 posts. 2 in the front, 3 in the back so we can install some type of boards / lattice to not have neighbours peeking in when we're looking.

Alternative is to do the pergola / gazebo and build a short wall around it, then allow for screen mesh to be installed. That's to be decided still.

You building a deck floor on it?
 
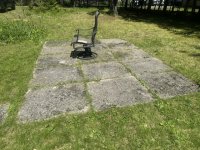
No. This is around the patio stones I posted a few pages go. If we ever go the slab route, it'll be b/w the posts, but the posts will not be on any concrete deck, only in/above the footers that go 4ft down.
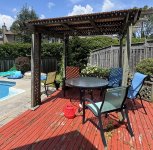
Ok. This is mine I built about 15 years ago. The deck floor keeps everything solid along with the rafters. These are 4x4s.
50eb00ae00f59925de8267d03ddb5360.jpg
134380a11091b01017b2c75ee9d4ef8a.jpg


Sent from my SM-S938W using Tapatalk
 
Ok. This is mine I built about 15 years ago. The deck floor keeps everything solid along with the rafters. These are 4x4s.
50eb00ae00f59925de8267d03ddb5360.jpg
134380a11091b01017b2c75ee9d4ef8a.jpg


Sent from my SM-S938W using Tapatalk
Very nice! I wasn’t planning on putting a deck floor on it.

In all honesty i want to make it large enough (within no permit needed requirements) where I can park the car under it in the winter when we go up.

The area currently looks like this…

1784822824316.jpeg

Plan is to go to one extra row / column of pavers and then cover that.
 
Help me settle an argument with dad GTAM brain trust...

Planning on building a 10x11 or 11x11 gazebo / pergola at the cottage in the fall.

Dad opinion:
- post MUST be embedded in the concrete footing to be good

MP opinion:
- post CAN be placed ABOVE the concrete footing on brackets to prolong life and still maintain rigidity

Which of us is correct?

Plan is to use 6x6 posts. 2 in the front, 3 in the back so we can install some type of boards / lattice to not have neighbours peeking in when we're looking.

Alternative is to do the pergola / gazebo and build a short wall around it, then allow for screen mesh to be installed. That's to be decided still.
Ag @GreyGhost mentioned, wind loads are tougher to manage with saddles on piers compared to sunk posts.

If the pergola is open, I’d sink the posts otherwise it might turn into a kite. If it’s enclosed, the perimeter walls (even screen) dramatically reduces uplift, you can build that on piers with saddles imbedded.

If you sink posts, spend the extra few bucks on 8x8s. They twist less and the ground contact life is almost double 6x6 (in well drained sandy soil, expect 70+ years.)
 
Ok. This is mine I built about 15 years ago. The deck floor keeps everything solid along with the rafters. These are 4x4s.
50eb00ae00f59925de8267d03ddb5360.jpg
134380a11091b01017b2c75ee9d4ef8a.jpg


Sent from my SM-S938W using Tapatalk
That’s open on the roof, you won’t get much uplift on that. If you had a solid shingled roof, that design would be risky, an occasional 60mph gust could create 3000-4000lbs of upforce, that would fly.
 
Ag @GreyGhost mentioned, wind loads are tougher to manage with saddles on piers compared to sunk posts.

If the pergola is open, I’d sink the posts otherwise it might turn into a kite. If it’s enclosed, the perimeter walls (even screen) dramatically reduces uplift, you can build that on piers with saddles imbedded.

If you sink posts, spend the extra few bucks on 8x8s. They twist less and the ground contact life is almost double 6x6 (in well drained sandy soil, expect 70+ years.)
Thanks.

We have a similar design (smaller) in the back and it hasn't moved an inch. It's sitting on gravel instead of being dug into the ground for support.

This one I'll do a 4ft base. My biggest concern is the 6x6 (or 8x8) rotting over the years and then it's a pain to replace without having to jack hammer the base.

That's why I was wondering if brackets atop the concrete could work, but it appears from both you and @GreyGhost that it's best to sink them into the concrete.

Dad was right...as most times...

Our current gazebo at home is on 6x6 fake posts and I can see some twisting from the bolts drilled into the concrete from heavy winds.
 
Thanks.

We have a similar design (smaller) in the back and it hasn't moved an inch. It's sitting on gravel instead of being dug into the ground for support.

This one I'll do a 4ft base. My biggest concern is the 6x6 (or 8x8) rotting over the years and then it's a pain to replace without having to jack hammer the base.

That's why I was wondering if brackets atop the concrete could work, but it appears from both you and @GreyGhost that it's best to sink them into the concrete.

Dad was right...as most times...

Our current gazebo at home is on 6x6 fake posts and I can see some twisting from the bolts drilled into the concrete from heavy winds.
I would (and have) mounted them on top of 4' sonotube footings. Just design the connections at the top to deal with the racking (simplest solution is pretend it is the bottom of an elevated deck and install diagonal braces that deck would need). I don't like buried wood and I like wood encased in concrete even less.
 
Last edited:
Here’s our pergola. It appears to be mounted in those concrete cutouts for decks, underneath the deck.
IMG_4466.jpeg
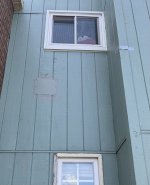
Here’s the tin over our woodpecker hole. The wood under the left window corner is rotted in about a six inch by four foot area. I suspect there was a leak in the old window frame. Unfortunately, those are 4x8’ panels in the area, so I can’t just replace a board.

IMG_4468.jpeg
 
That’s open on the roof, you won’t get much uplift on that. If you had a solid shingled roof, that design would be risky, an occasional 60mph gust could create 3000-4000lbs of upforce, that would fly.

If I was doing it again I’d use 6x6s but the 4x4s have been fine for this and that’s what I could afford when I built it years ago. Hammocks get hung between the posts too. The deck floor and rafters rigidify everything and the posts were sunk in concrete as far as I could dig down. It was never going to be closed in, the vines were encouraged to grow there for shade. Aside from this year, which has been crap for grapes, we get a very decent yield.
 
If I was doing it again I’d use 6x6s but the 4x4s have been fine for this and that’s what I could afford when I built it years ago. Hammocks get hung between the posts too. The deck floor and rafters rigidify everything and the posts were sunk in concrete as far as I could dig down. It was never going to be closed in, the vines were encouraged to grow there for shade. Aside from this year, which has been crap for grapes, we get a very decent yield.
I always debate b/w the 4x4 or 6x6 whenever I'm building something.

Leaning toward the 6x6 but not sure if I need to buy the 12ft or 8ft will suffice. Don't need this thing super tall so will do some measurements and then decide. 4ft deep minimum considering the winter frost up there.

I'm still shocked the wood shed hasn't shifted an inch considering they're literal pavers atop a small mound of gravel.

EDIT: This appear to allow for mounting above the concrete, while still maintaining resistance to torsional / lateral forces.

 
Last edited:
Two schools , if I was to sink a post again I would paint the post going into concrete with driveway sealer as an added layer . We used creosote for years ( very bad now) so driveway sealer is the choice now for farm fence posts .
If I was to surface mount , the Home Depot brackets are not what I want to use ever . I’d fab my own or hire a welder buddy , the bent sheet steel are borderline crap , some good 1/4” plate and over build .
As the others mentioned , racking is a concern but nice design fixes that , heavy frame and timber lock screws .


Sent from my iPhone using GTAMotorcycle.com
 
When guys talk uplift , four patio stones or cinder blocks weigh sixty pounds each . Does not take much of a parachute to lift that . We had one of the build yourself arch steel Quonset huts , twenty four x forty . Doors left open one afternoon and the once a decade storm hit , it landed seventy feet away .


Sent from my iPhone using GTAMotorcycle.com
 
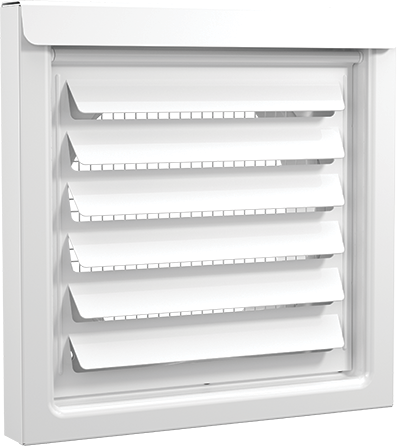
Cleaned up some venting that had seen better days. Bought a few Inovate wall vent covers to replace a broken plastic cover and an aluminum dryer vent cover that had lost its flapper. They are skookum. Nice heavy guage, magnet closure to keep them closed and animals out but still pop open with the fan or dryer kicks on. They don't have an airtight seal as you can still see light through them but ime, seals are a starting point for lint collection. I disassembled the rest of the dryer vent pipe, cleaned it all, reassembled it with new screw clamps and tape as part of the project.
images


Next round of project will be replacing tired plastic HRV vents with Inovate Freshvents. The supplier I ordered from didn't have the larger vents in stock.

FreshVent-White-FRV6W-Sm.png
 
Last edited:
This is a complicated beast. Pressurestat, auto fill, external pump, etc. Pressure gauge is dated 1994 so that is probably close to the machine age.

Here is the drawer of small parts/assemblies cleaned up and ready for reassembly. Boiler is interesting. I couldn't find schematic diagrams for the internals. It turns out that inside the outer welded stainless vessel, there is a separate inner cylinder. I havent traced plumbing yet but I assume the inner cylinder will be the steam generator.

20260626-153216.jpg


This thing is too big to fit on the counter. I'll need to build a cart to house it. Counter level on cart will be something like 6" lower. I have some old bamboo counter that I can use. I havent decided what it looks like below that. Probably a cabinet to hide the pump (about the size of a small watermelon), waste bin (~2L and avoids drain tie in) and likely filtration/water treatment (this may be most expensive part of this project). If I end up selling the machine, the cart will probably go with it.

Edit:
Large outer chamber is steam creation (pressurized hot water), inner chamber is hot water.
Rebuilding machines is fun. Lots of tests. So far I've needed to do plumbing, electrical, make gaskets, lap valves, polishing, etc.

I've pressurized it with air to find most of the hiccups before I put water in and end up with a mess. A few tiny leaks somewhere that I can't find with air. Loses a few psi per minute. Hooked up to water, the drips will give the problem spots away.

For those with more experience, I lapped a Teflon on brass safety valve at 320 grit because that was the adhesive paper I had. How fine do people normally go? That valve trips at 22 psi so no high pressures involved. Before lapping, it was leaking at 5 psi.

I still need to make a junction box to hold the wire connections between pump and machine. The pump just has a 1' pigtail with connections inside the frame somewhere. A junction box near the pump makes it easy to drop wires through the cart.

So far, I am only in for my initial purchase price and a bunch of time. While I was planning on replacing some seals as they were tired, they seem to work and getting them would be expensive. $20 worth of seals (that easily fit in a small envelope) and they want $65 USD for shipping. Screw that.
 
Last edited:
Rebuilding machines is fun. Lots of tests. So far I've needed to do plumbing, electrical, make gaskets, lap valves, polishing, etc.

I've pressurized it with air to find most of the hiccups before I put water in and end up with a mess. A few tiny leaks somewhere that I can't find with air. Loses a few psi per minute. Hooked up to water, the drips will give the problem spots away.

For those with more experience, I lapped a Teflon on brass safety valve at 320 grit because that was the adhesive paper I had. How fine do people normally go? That valve trips at 22 psi so no high pressures involved. Before lapping, it was leaking at 5 psi.

I still need to make a junction box to hold the wire connections between pump and machine. The pump just has a 1' pigtail with connections inside the frame somewhere. A junction box near the pump makes it easy to drop wires through the cart.

So far, I am only in for my initial purchase price and a bunch of time. While I was planning on replacing some seals as they were tired, they seem to work and getting them would be expensive. $20 worth of seals (that easily fit in a small envelope) and they want $65 USD for shipping. Screw that.
320 is a bit aggressive for a water or steam valve… 800-1200 on the brass side, teflon (Pfte) can’t really be polished with any type of grit, it’s soft and grit will imbed.
 
320 is a bit aggressive for a water or steam valve… 800-1200 on the brass side, teflon (Pfte) can’t really be polished with any type of grit, it’s soft and grit will imbed.
I figured it was a little aggressive. I have some sheets of finer grit but they aren't adhesive and I didn't feel like doing another step. I can see the scratches on the seat in a loupe but am hoping the teflon is soft enough to conform. I can't detect an air leak right now but if water seeps past, I can easily remove the valve and improve the finish (or even replace parts if I can't win). It doesn't appear to leak until 2 bar and then opens and dumps back to ~1.9 bar. That chamber should be running around 1.5 bar when I'm not manually pressurizing the system.

The embedded grit (I can't see it on a 10x loupe but it may be there) is an improvement over the depression caused by sitting on the seat for more than a decade. I was slightly surprised that the sandpaper made easy progress on the teflon. I washed it with alcohol after sanding to remove what I could.
 
Last edited:
Good start , maybe consider getting some oak plugs and countersinking the screws for neater look . You’ll have trouble getting red oak to stain close to the plank floor , use white oak next time .


Sent from my iPhone using GTAMotorcycle.com
 
Back
Top Bottom