Looking for recommendations... | GTAMotorcycle.com

Looking for recommendations...

POWERMAN

Well-known member
Short Story long...

Last year I barely rode at all due to which I still had the same tank of treated petrol I had filled back in December 2019 prior to putting it away for storage.
I noticed that the CEL had popped up and upon checking it was error code 33 = Oxygen sensor.
Didnt bother to deal with it then but I did get the bike through start/stop cycles to see if it would clear away on its own - it still persisted.

After reading up online - one of the possible causes for this could be stale petrol.
So I decided to try and empty out the tank, fill it with fresh fuel and have it run again to see if the code would clear.
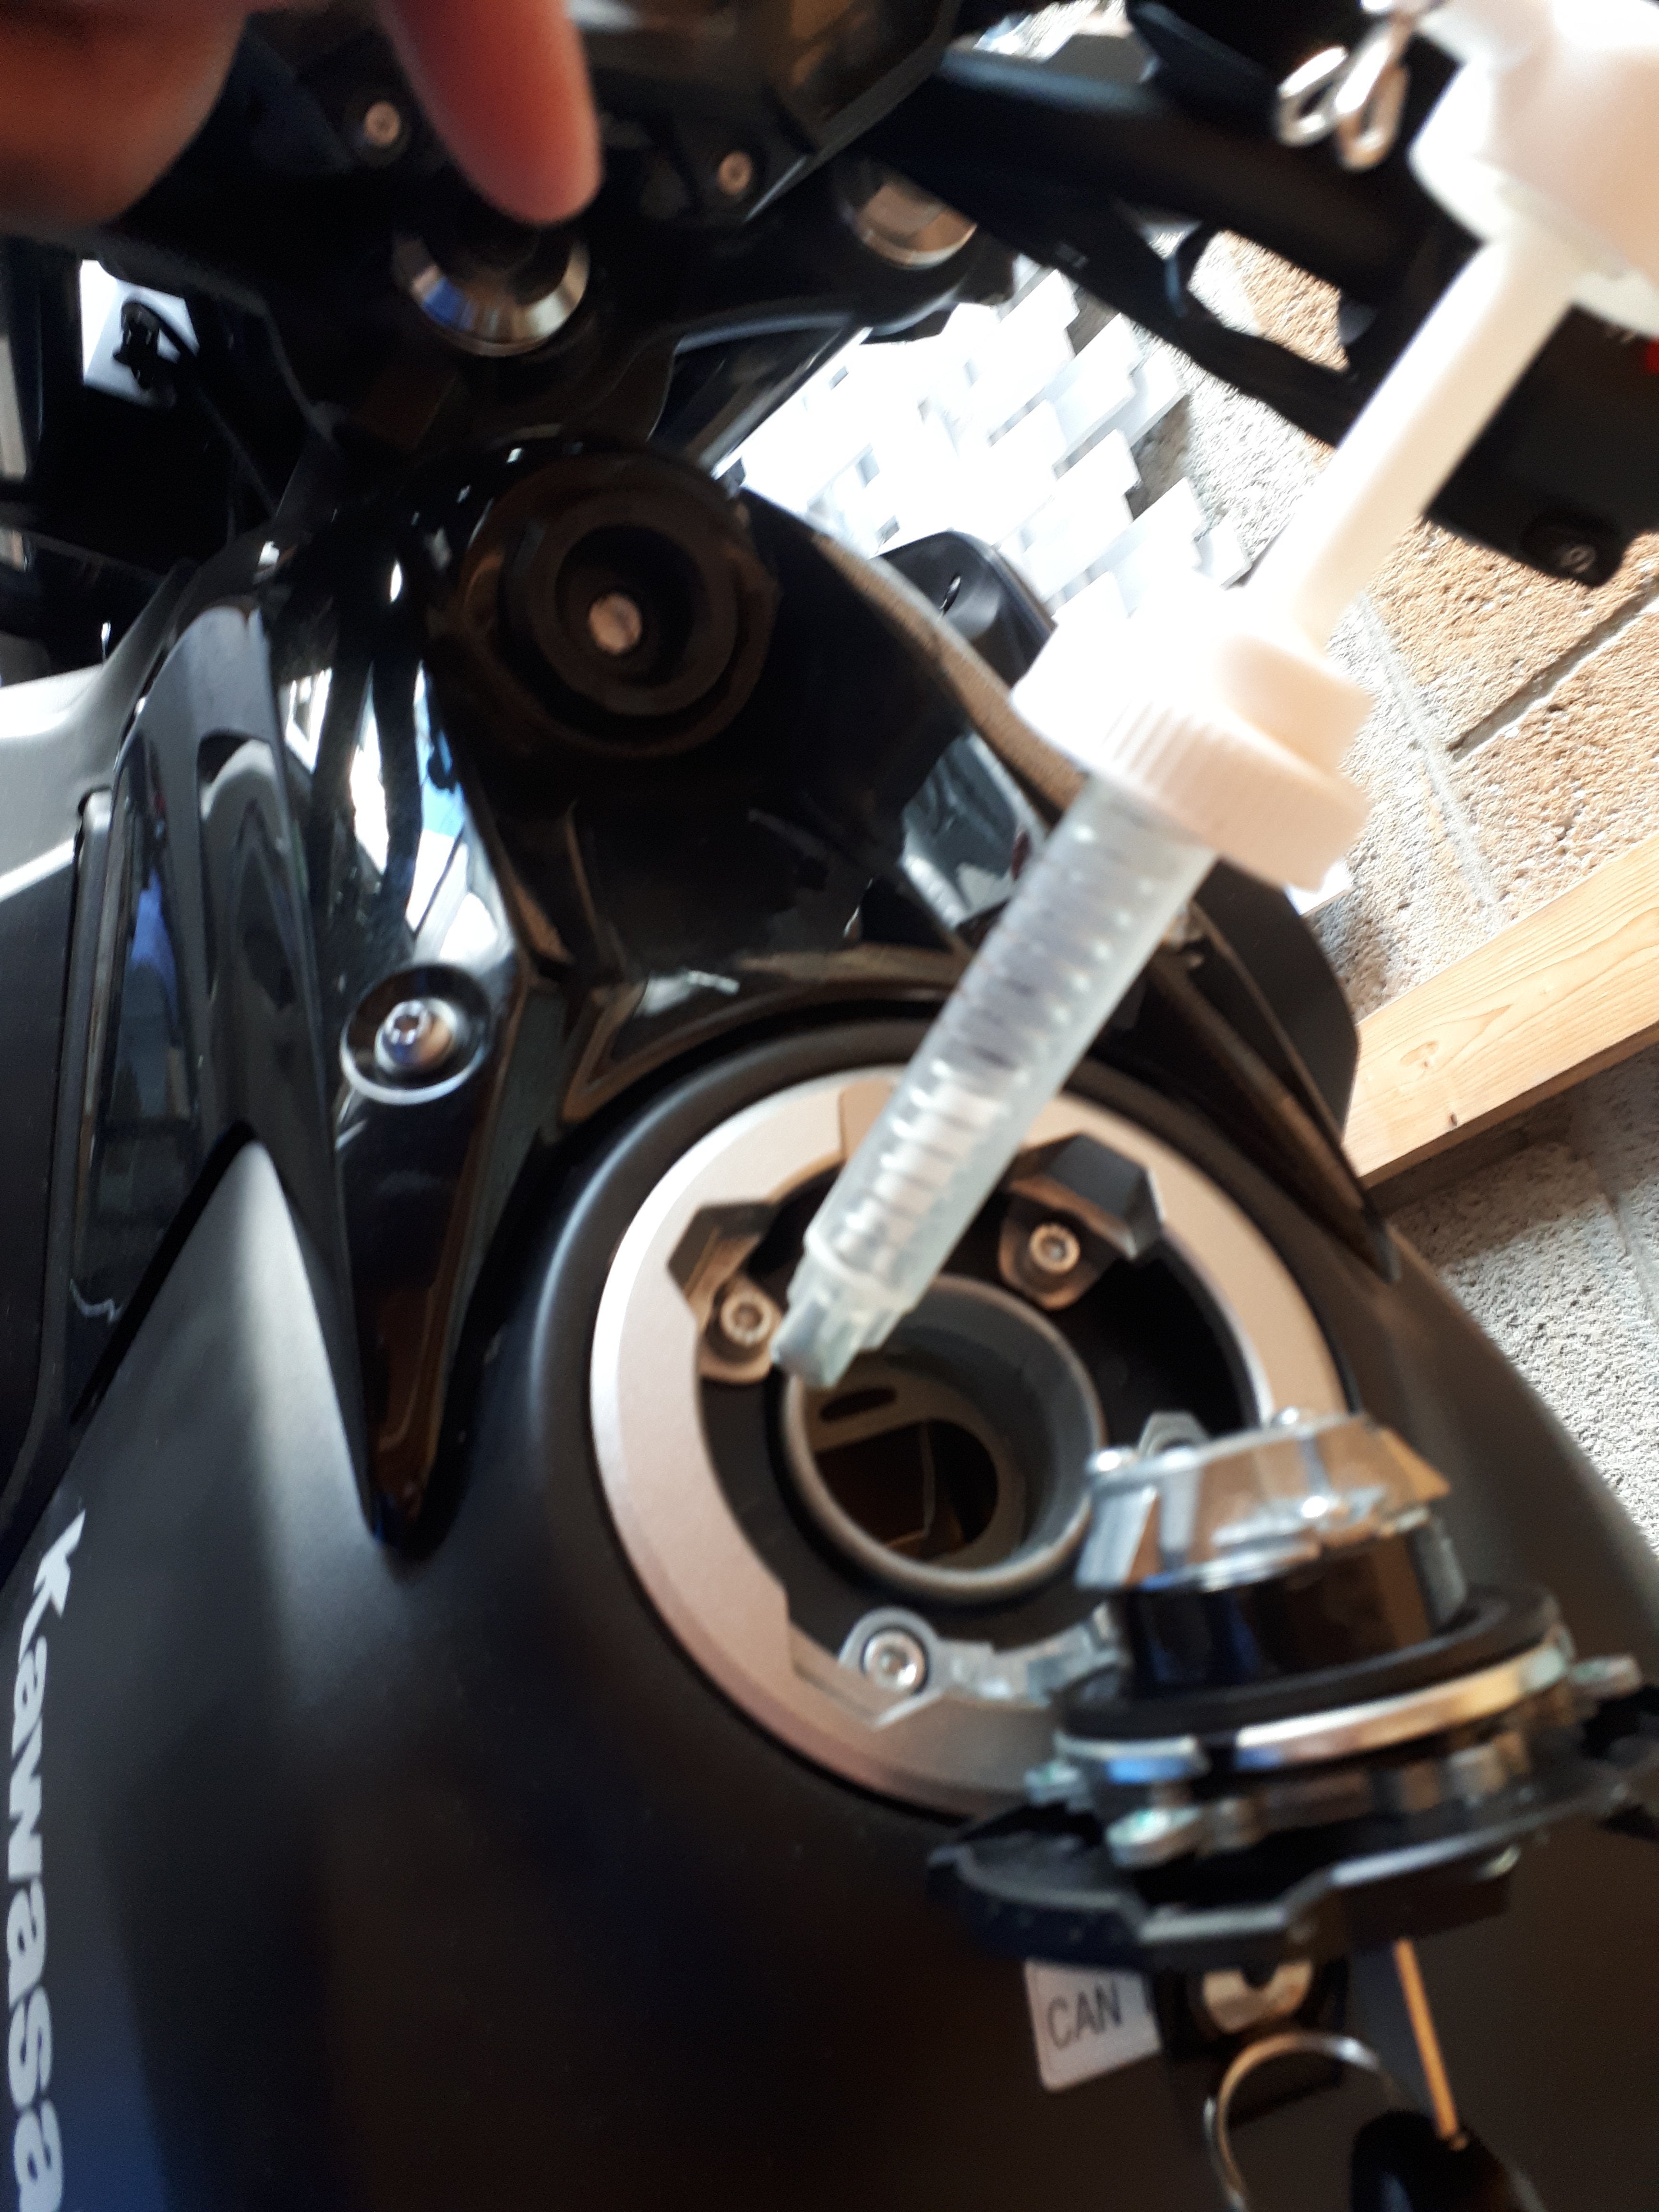
Lo and behold, the el cheapo pump I got from Amazon detached at the base and fell into the tank...#$%$@#@
20210214_120225-jpg.122984

Still feeling lazy, I contacted Snow city to see how much it cost to remove the tank and recover that plastic 'straw'.
Figured since I was going to pay labour for tank removal, may as well get the air filter and plugs changed as well.

After seeing the quote of $800+, I suddenly felt inspired to do it all myself - ended up ordering parts from Partzilla thanks to this thread.

Now comes the important question - what tool or toolset do you recommend in order to get a 16mm thin wall spark plug socket with the rubber 'grips / ring' or magnetic insert?
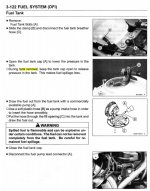
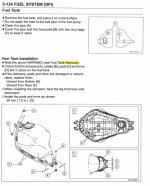
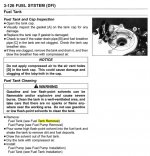
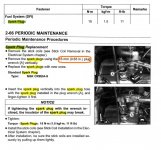
The service manual states the following:
type-jpg.47031

I see that Canadian tire has a sale going on right now but most of the sizes are listed in SAE instead of metric.
The closest I can find to 16mm is 5/8'' which translates to 15.875 mm

1) Any tool recommendations for spark plug removal / installation?
2) Any tool recommendations for a torque wrench that is tuned for values below 20 ft-lb (the lowest I could find in Canadian tire was 20 ft-lb only)
- Or should I just hand tighten like a lot of folk do online?
3) Any suggestions on how to remove the plastic straw once I remove the fuel? It has this setup so I figure I will have to do a lot of shaking to get it out at the right angle again...

20210214_122038-jpg.122985


Thank you!
 

Attachments

  • Type.jpg
    Type.jpg
    154.2 KB · Views: 141
Last edited:
Now comes the important question - what tool or toolset do you recommend in order to get a 16mm thin wall spark plug socket with the rubber 'grips / ring' or magnetic insert?

You need a ⅝" socket. NGK 6289 CR9EIA-9 Laser Iridium Spark Plug

2) Any tool recommendations for a torque wrench that is tuned for values below 20 ft-lb (the lowest I could find in Canadian tire was 20 ft-lb only)
- Or should I just hand tighten like a lot of folk do online?

You can go without a torque wrench if you're in a jam. I have several torque wrenches, so I use 'em.

A single torque wrench will not cover all values. Ft/lb. wrenches in ⅜" drive can be found as low as 5 ft/lb, but for values that low, I suggest a torque wrench calibrated in inch/lb. A typical ⅜" drive wrench might be 30-250 in/lb. Your 11ft/lb equals 132 in/lb.

But you really ought to ask Trials. I'm sure he'll have a better answer.

Sorry, I can't offer any help with your fuel tank. Good luck with it.
 
fuel tank, best thing I can think of is remove and drain
turn upside down and shake it until you see the plastic bit - probably a 2 person job
then grab with needle nose pliers and yank it out

11 ft/lbs is a low torque spec
unless you're buying a pro grade wrench the result is not going to be reliable
you'd be looking for an inch pound wrench, 11 ft/lbs = 132 inch pounds
torque on a spark plug is not that critical
some washer crush to seal is all your looking for

and agree on the socket
5/8 inch deep socket, 12 point is usually thinner walled
not a big deal if it doesn't have the rubber insert, just be careful with it on the plug
 
Spark plugs are 5/8 (16mm) or 13/16 (18mm) in a late model motorcycle. As for torque, if you have changed a lot of sparkplugs you probably have a feel for the correct torque, if not use a torque wrench. You can pickup a simple beam type for $25 at Princess Auto.

If you don't want to buy a torque wrench, run the plug in as tight as you can with your fingers, then go 1/2 turn further to crush and seat the plug's washer.

Capturing the straw should be easy. Leave the tank on the bike, remove the cap and fill neck from the tank, shine a good light inside then retrieve using a pair of long nose pliers.
 
Ya, till the plug seats and 1/2 turn.
Plastic straw? What harm will it do? Should be an intake screen on the fuel pump. If it were mine....fugetaboutit.
 
Ya, till the plug seats and 1/2 turn.
Plastic straw? What harm will it do? Should be an intake screen on the fuel pump. If it were mine....fugetaboutit.
Wonder if it would float when the gas was filled?

Sent from my couch using my thumbs
 
Thank you all for the feedback!

Feeling a lot more confident now.
Will report back once done!
 
  • Like
Reactions: J_F
Honestly - I was worried about it start to disintegrate over time and gum up the internals : (
it could, who knows? only one chemist I know of on the forum and he hasn't commented

I'd be getting it out of there too
 
The tank inlet does come apart. It's a bunch of tiny set screws that are a pia, but then you can just reach in and get it.
 
Is there a bunch of very tiny holes on the inside edge?
Do you have a parts diagram? Make model year.
 
It is a 2017 Kawasaki Z650.
Unable to locate any other holes - those four holes you see there are the bolts I removed in order to detach the fuel cap setup.
The other two black holes are for drainage.

I only have the service manual and these were the most relevant diagrams I could locate w.r.t the tank (attached).

I suspect that inlet portion is either integrated into the tank or has screws that are maybe accessed from underneath...?
 

Attachments

  • 1.jpg
    1.jpg
    172 KB · Views: 8
  • 2.jpg
    2.jpg
    163.3 KB · Views: 8
  • 3.jpg
    3.jpg
    158.2 KB · Views: 8
Looks like the access is from the underside, which is still doable but means tank removal and new seals.
 
I would be surprised if you can open that inlet anymore without performing harikiri on the tank.

If it was me, I would drain the tank and then see if I could fish out the straw. A cheap borescope attached to your phone ($30-40 on amazon) could be useful, and maybe one of those claw tools posted above. Either way, should not be a big deal.

As Wingboy mentioned, removing the fuel pump and going through that hole should you give you a lot more space to work with if needed.
 
I wouldn't worry about it. Leave it in there.

If you want to remove it, you'll have to take off the tank:
I would turn the tank over and bounce it around till you can grab it through the filler hole.
or
Use a borescope and dig it out
or
Remove the pump from the bottom and then bounce it around till you can grab it.

I'm lazy, I'd leave it there and do my best to forget ALL about it... twas a bad idea from the word go. Now you have to remove the tank ANYWAY...you should have STARTED there.

... and while you're dickin' around with other stuff; charge the battery and leave the battery disconnected for 48hrs, hopefully to reset the SEL, put it back into learn mode to see if the same code comes back, after you put fresh gas in it.
 
What a freakin MESS.
Busted knuckles, swollen fingertips, reeking of petrol and an aching back...sigh

Spent a couple of hours going over this step by step all while taking care not to damage or break any brittle plastic pieces due to the cold.
My space heater could barely keep up and each time I opened and closed the garage door - poof - back to freezing temps again.
Makes me wish I had a nice well lit heated spacious garage.

Finally managed to get the tank off but it looks like I will have to go in from behind/underneath as I can hear it bang around inside when shaking the tank - think I've had enough of petrol fumes for one day.

Its funny how one can experience a wide range of emotions when doing things like this.
At one point I was even questioning my life choices and my reason for existence.

hmmm.jpg

Should've just payed the dealership....smh
 
What a freakin MESS.
Busted knuckles, swollen fingertips, reeking of petrol and an aching back...sigh

Spent a couple of hours going over this step by step all while taking care not to damage or break any brittle plastic pieces due to the cold.
My space heater could barely keep up and each time I opened and closed the garage door - poof - back to freezing temps again.
Makes me wish I had a nice well lit heated spacious garage.

Finally managed to get the tank off but it looks like I will have to go in from behind/underneath as I can hear it bang around inside when shaking the tank - think I've had enough of petrol fumes for one day.

Its funny how one can experience a wide range of emotions when doing things like this.
At one point I was even questioning my life choices and my reason for existence.

View attachment 47048

Should've just payed the dealership....smh
Pay the dealer to have an 18 year old kid break the plastics?
 

Back
Top Bottom