What did you do in your garage today..?

Decided to focus on one of my project VF500s, instead of working on both of them together.

At first planned to work primarily on the first bike I bought as I had already done some stuff like change fluids, etc. Was about to take good starter solenoid from bike #2 and put it on bike #1 - which had a bad solenoid - when I realized that bike #2, being in better cosmetic shape, might also be in better mechanical shape.

So switched plans and decided to work on #2 primarily, leaving the good solenoid there. The ignition key turned on some lights on the instrument panel but nothing else seemed to work. Checked the fuses, realized the ends and the fuse holders were oxidized and that continuity was intermittent at best. Tried to lightly clean them and then one of the arms on the fuse holders broke. Just when I started looking forward to having to order parts on Amazon and learning how to solder, I realized - I now have a parts bike to steal from!

Took the fuse panel from the other bike, cleaned its holders, put in the right size fuses (both bikes had many fuses much larger than specified by their respective circuits) and lo and behold - the starter motor turns when I press the button.

Next challenge is going to be the carbs. The PO had taken the carbs out. I went to look inside and one of the float bowl screws broke in half. Tried to drill it out with an extractor - haven't had success yet. Of the remaining 3 carbs, i could only open one of the float bowls. The other 2 seem to be stuck shut hard.

Interestingly, I found a video online where the poster had also struggled with the same problem - he thought his bowls had been glued or otherwise adhered shut. Not sure if this is a thing for this bike, for all old bikes, or just coincidence.

I had read all sorts of horror stories about working on carbs on these bikes. We'll see. Besides small engines, I've only worked on one set of carbs - from a CBR600F1.
 
Those Kehin carbs are not hard to work on. A few things to know.

They are CV carbs. I like to put new diaphragms into older bikes when rebuilding. They are cheap, if they are stretched, torn or stiff the carbs will be hard to setup.

You will need a vacuum gauge to sync.

You must have good boots - replace them to be sure, they are cheap. Same with vacuum hoses.

You need to have the air box AND stock filters connected to minimize tuning challenges.

Unless you have an aftermarket exhaust, make sure pilot is 32, main 112 and float height 14-15mm. Air screws 1.5 -2 turns to start, needles in 3rd from the top.

If the float bowl screw are stuck, soak them with PB blaster (or similar) then use an impact tool to remove them. Replace with hex head stainless screws, should be 6mm x 15mm. (Check them).

if the carbs are really dirty, have them electronically cleaned. Not usually necessary, a good carb spray and compressed air should be good.
 
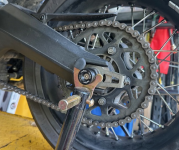
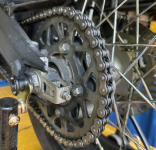
Cleaned and lubed my chain as I thought @JZ67 was interested and would come check it out! Put in fuel stabilizer as I'm basically parking the bike early. Was considering replacing it, but it looks to be fine along with the sprockets so I'm not going to bother at this time.

1760441689368.png

1760441709874.png

Went for a quick boot around the neighbourhood to check the rear brakes after fluid change, and wow...wow. I may do the front fluid at the start of next season.

Bike sounds effing awesome when I don't have ear plugs in.
 
Those Kehin carbs are not hard to work on. A few things to know.

They are CV carbs. I like to put new diaphragms into older bikes when rebuilding. They are cheap, if they are stretched, torn or stiff the carbs will be hard to setup.

You will need a vacuum gauge to sync.

You must have good boots - replace them to be sure, they are cheap. Same with vacuum hoses.

You need to have the air box AND stock filters connected to minimize tuning challenges.

Unless you have an aftermarket exhaust, make sure pilot is 32, main 112 and float height 14-15mm. Air screws 1.5 -2 turns to start, needles in 3rd from the top.

If the float bowl screw are stuck, soak them with PB blaster (or similar) then use an impact tool to remove them. Replace with hex head stainless screws, should be 6mm x 15mm. (Check them).

if the carbs are really dirty, have them electronically cleaned. Not usually necessary, a good carb spray and compressed air should be good.
Thanks @Mad Mike - that's good - and very specific ! - intel. Do you have experience with these bikes in particular?

I just ordered a set of rubber gaskets and o-rings on eBay based on the recommendations of a guy on one of the VF500F FB groups. Maybe should have done some more research as there are other sets with jets and diaphragms for less, but... a recommendation can be worth a lot. He claims to have used them on his builds.

Diaphragms look good, but I'll probably take your advice and order a set. Boots I'll probably order for sure - apparently new soft boots make all the difference in getting them back in.

I expect cleaning the carbs and putting them together is going to take me a long time. Right now I have the bank sitting on my dining table at the cottage. My wife isn't happy about that. I may have to bring them back and forth between home and cottage just to find the time to make progress on them.

When I did the carbs on my CBR600F1 a few years ago, after cleaning every little bit in my little ultrasonic, I put them together and took them apart maybe 20 times, LOL. It got to the point where I could do it really quickly. I'll probably have to do that this time to relearn what I forgot. I will say this - the way the bank is set up, it feels a lot more complicated and just looks a lot more intimidating.

I do have a Carbtune but I never got around to actually learning how to sync the F1. I'm sort of dreading that - the videos I've seen of syncing the VF500, it looks painful. Apparently at least one of the screws is nearly inaccessible on this bike. The guy in one video was fuming that he had to buy a $110 Motion Pro tool to get to one in particular.
 
Looks like a good day to get some bike maintenance done. It has been too long since the last coolant change. Now I remember why I dislike that job. Almost all the Tupperware has to come off except the upper fairing. A pain to drain as the drain plug doesn’t get all the coolant and you have to loosen the lower hose on the radiator ( which felt welded on). I won’t mention how you get the air in the radiator neck to blow the rest out. I forgot the part about putting the drain plug loosely, and the result was coolant everywhere duh.
Was chasing a clanging noise on the right side, found a loose muffler clamp. Some penetrating oil and it slowly started to move. It took some time. Found an oil weep under the right valve cover; that will have to wait for another time.
Got it all back together with edit: (without) any parts left over and didn’t lose any screws down carburetor alley.
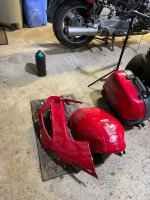
IMG_5614.jpegIMG_5615.jpeg
 
Last edited:
That's rare for me. I find those Japanese engineers are always adding unnecessary washers.....
And different kinds. Flat ones, recessed ones. I wish they stuck to one fastener style . To take all those off there was a 5 mm hex, JIS screws (philips), and 10mm wrench.
I thought I could do it in my sleep but messed up the order on the right side and had to do it twice. Amazing how with each screw the panels go from flimsy back and forth to solid. I bow to those who design such things. As long as you don’t have to take them apart.
 
And different kinds. Flat ones, recessed ones. I wish they stuck to one fastener style . To take all those off there was a 5 mm hex, JIS screws (philips), and 10mm wrench.
On a couple of my bikes I've swapped all of the fairing fasteners to these bolts with captive washers:

In some cases I've drilled out M5 threads and re-tapped to M6 so that every fastener is exactly the same. It's really nice to just pull them all off with the same tool, dump them in a pile and not worry about tracking what goes where.
Thanks, I have a few of those and have had the washers roll away into the fastener eating garage floor.
Thanks for the link, I would never have thought of F9 for hardware.
 
A pain to drain as the drain plug doesn’t get all the coolant and you have to loosen the lower hose on the radiator ( which felt welded on).

My solution for that was to drain the rad, refill with new Type 2 coolant, start up the bike and then bring it to temp so fan comes on, then drain again once the bike cools down. There's enough coolant in a 4l jug of Honda Type 2 to do this and it avoids pulling the hose and the engine drain plugs, which are a huge hassle. By my calculation of coolant capacity and the amount drained out doing the flush gets about 95% of the original coolant changed out and that was more than good enough for me.
 
My solution for that was to drain the rad, refill with new Type 2 coolant, start up the bike and then bring it to temp so fan comes on, then drain again once the bike cools down. There's enough coolant in a 4l jug of Honda Type 2 to do this and it avoids pulling the hose and the engine drain plugs, which are a huge hassle. By my calculation of coolant capacity and the amount drained out doing the flush gets about 95% of the original coolant changed out and that was more than good enough for me.
This makes sense. The engine drain plugs location is horrible, hence the hose removal. Also would be less mess. I think I will just drain the radiator every couple of years and refill that amount. That should be good enough. This coolant says 250,000 km change interval.
 
Another option is to use distilled water for your flush and then use a little less water for your fill (you dumped in 4L of water and 3L came out the second drain so use 1L less water when you fill). Cheaper than antifreeze.
 
Another option is to use distilled water for your flush and then use a little less water for your fill (you dumped in 4L of water and 3L came out the second drain so use 1L less water when you fill). Cheaper than antifreeze.
I was going to flush it with tap water then I thought, I will just use the new coolant and maybe drain next year instead of waiting two years. I thought about getting the concentrated stuff and adding my own distilled water. But I took the short cut and used the pre-mix. The manual stresses silicate free coolant and all the Prestone stuff has no statement about silicate. So I got the Honda (car) coolant that specified no silicate.
The bike will outlast me.
 
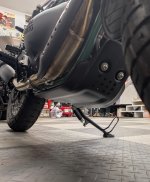
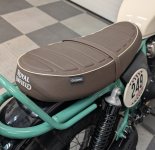
Changed the oil in the RE before i put the new sump guard on it. And swapped the stock seat for a "Signature" comfort seat. The stock seat was too thin and narrow at the front. Only$260.PXL_20251020_232329454.jpgPXL_20251020_232251265.jpg
 
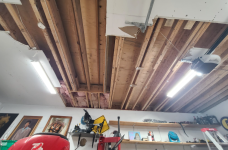
Nice framing work too!

Yeah, this garage has been through hell. It had an illegal second story added to it. Apparently had a hot tub on the second floor (wtf?). A bunch of modifications were made. Previous owner was a POS so the neighbours complained to by law and it sounds and looks like they just ripped everything out and hodge podge tried to cover it up.

We've had to redo a lot of the previous "work" done in this house. When we bought the place, we found out on closing day that the guy had three private mortgages on the property, and for like the first 3 years afterwards, people kept coming by the house asking if the previous owner was home because he owed them money... so... I don't know if the **** workmanship was on him, or on the fact he wasn't paying people, either way, we bought a very pretty house that has gotten a lot of undoing and redoing, and won't be buying from a house flipper again lol

If anyone needs me I'll be in my imaginary second story garage hot tub with girls who like all the motorcycles I have on the ground floor.
 
Last edited:
Back
Top Bottom