

Is there a convenient way to fix finger wear gouges in cupboards.
Ours are around fifty years old, but there’s lots of them and they match.
Ours are around fifty years old, but there’s lots of them and they match.








Plumbing is an easy fix. Raising the cottage or lowering the slab is big work.My biggest issue with the basement is that it's about 78" without any floor/ceiling so meeting the 80" minimum is very difficult.
And unless I go lift it up, or get a variance to the code then it's a non starter...of course there's also the non-code version of the work that can be done.
EDIT:
Red - where the drain is for the entire cottage
Green - where I would plan on putting a bathroom if we ever got to that stage in the basement
View attachment 79976
Blue - where some idiot (not my dad...I asked) decided to install a horizontal line for drain from bathroom to the sanitary sewer
View attachment 79977
If I ever do build up the basement...I'll need to figure out a way to deal with that blue rectangle as the line is literally at mid-height in the basement. Either put it up higher, or dig into the concrete and build it like it should have been done 20+ years ago.
I use them whenever possible. The uppers hang on a track, the lowers go on adjustable sets.I’ve done two IKEA kitchens , first one took a while but once your into Swedish think , the boxes go together very quickly . The metal cleat system is very good , get a laser level on a tripod and make life simple . I like them so much I’d put one in almost any house .
Sent from my iPhone using GTAMotorcycle.com
For uppers, if it’s a new build or gut, I block between the studs using at least 2x6 .The ones I'm looking at from IKEA use the metal cleat system.
Hardest part will be finding the studs and ensuring the stud finder is a good quality one.
Thanks that’s a great idea with the plywood. I’ll use that if I get the job.For uppers, if it’s a new build or gut, I block between the studs using at least 2x6 .
View attachment 80011
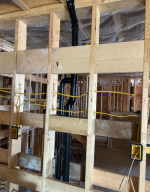
If it’s a kitchen Reno ( not gutted) I rip off a 30” wide strip of drywall and replace it with plywood screwed right to the studs. You still want to hit studs when hanging boxes over the ply, the advantage is you know where the studs are, you eliminate the bump on vertical drywall seams, and you have a reasonably strong connection if the box ends sit wide of a stud.
It is the same height as the cabinets. You can do 10 or 12” , I use one bigger patch to eliminate the rise in drywall butt joints and to have plywood on the upper and lower screw points for the cabinets. .Thanks that’s a great idea with the plywood. I’ll use that if I get the job.
Quote went out yesterday so now we wait.
But why such a wide strip? The rail is very narrow and should be enough for. 10-16” strip to hold it up.

Thanks. Plan is to assemble it all at home and then take it to the installation spot. If anything is missing I'll know right away before I start ripping up things in preparation for installation.Last ikea kitchen I did was thier new product , it also uses a metal wall plate for the lowers , only the front legs are on adjusters , back clips to the wall plate . It’s genius . If you have space , assemble the boxes in another room so you’re not tripping over stuff . Have two cordless drills with appropriate bits , and a new Philips screwdriver to adjust the hinges .
I just built two maple boxes for a ski chalet in Ellicottville with 5 piece doors to match the 30 yr old painted kitchen . The cost was about twice what two ikea boxes would have cost .
My only advice with IKEA and I think @backmarker mentioned it , have all parts on hand before starting unless your sure you can fit the part later . If they back order you may end up driving to another store ( miles apart) or waiting weeks .
Sent from my iPhone using GTAMotorcycle.com




