Valve Job (cleaning and lapping) | GTAMotorcycle.com

Valve Job (cleaning and lapping)

Rockwell

Well-known member
I've had my engine apart for the past year and a half, and I finally have the next few months to try to get everything done. I've had a possible head gasket leak, so I ordered a bunch of new parts, gaskets included, and am currently working on cleaning the valves.

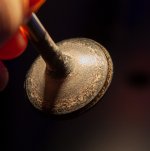
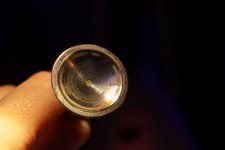
I soaked my first (exhaust) valve in Varsol for a while, then placed electrical tape over the stem and threw it in a drill. I used a medium Scotch-Brite pad while rotating in the drill to attempt to get the carbon deposits off. Here is what I have so far:
IMG_2711sm.jpg

Since this is my first time doing this, I am not sure how far to take it. Should I continue with the Scotch-Brite pad and attempt to clean these further?

If I reuse these valves (as opposed to buying new ones), I am going to lap them and test for air leaks. Looking at the seating face, do these look like signs of pitting? And, if so, will lapping rectify this?
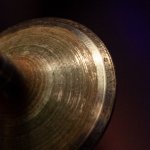
IMG_2713e.jpg
 
You can see when lapping is done as the entire sealing surface is uniform. Even if you buy new calves you should lap them in. Nothing is perfectly manufactured.
 
You can see when lapping is done as the entire sealing surface is uniform. Even if you buy new calves you should lap them in. Nothing is perfectly manufactured.
I bough some Prussian Blue and some lapping compound. I am going to do the lapping and measure that the seats and seating faces are within spec, and test for leaks.

If I do buy new valves, I was told to take them to a machine shop with the heads and have the surfaces cut properly. Is lapping just as acceptable?
 
Last edited:
I bough some Prussian Blue and some lapping compound. I am going to do the lapping and measure that the seats and seating faces are within spec, and test for leaks.

If I do buy new valves, I was told to take them to a machine ship with the heads and have the surfaces cut properly. Is lapping just as acceptable?
I wouldnt be bothering with blue. Easy to see contact without it. Dont see how it would hurt though.

Need for a machine shop is beyond my scope of expertise. Seems like a good idea. I am sure smarter more experienced people will be along shortly. @bitzz has a ton of experience bringing things back to spec.
 
Yeah, that's what I was told on another motorcycle forum. But I always like to get multiple opinions, especially when I don't really know what I am doing.
 
Why did you take it apart?
Is the head warped?
 
Did you confirm valve seat leakage before disassembly? If not broken, don't fix.

Clean valves and seats using something that loosens carbon, test again with cylinder head inverted on the bench, pour varsol into combustion chambers and see what happens. Large leakage will be obvious. Tiny seepage is ok. You can see which valve is leaking by drying it out and pouring varsol into the port with the head suitably angled.

Any cylinder head needing rework or new valves or new guides goes to the experts. Needs tools and expertise that I don't have.
 
Last edited:
If you install new valves, or mix up which hole the valve came out of, you should get the seats ground.
Personally, if I had it this far apart, it would be getting a triple angle valve job and new seals.
If the bike is more than 15-20 years old it would be getting new guides and springs.

You may be able to lap that valve... by lapping it you "see" how flat the sealing surface is. we can't tell by looking at a internet jpg. we need to see them BEFORE you clean them with a wire brush
 
Why did you take it apart?
Is the head warped?
In 2018 I was on a what was supposed to be a 6-week trip through the USA, into Mexico and back to Canada. I made it just outside of New Orleans when I noticed that the bike was running at 5 of 7 bars on the temperature scale, at highway speeds and moderate ambient temperatures. It's usually 4 bars under this condition. It was also getting poor fuel mileage, so I pulled over and noticed that my coolant reservoir was empty. I topped up and made it to New Orleans where I was able to stay with a friend and look things over. I was loosing all my coolant and it wasn't leaking out. I had to U-Haul the bike back to Canada and it's been out of commission ever since.

I got a straight edge to check the surfaces (haven't checked yet), got all new gaskets, going to rebuild the water pump with a new shaft and seal just in case it was that (this failed the first year I bought the bike), cleaning and lapping valves and going to replace the piston rings.

Did you confirm valve seat leakage before disassembly? If not broken, don't fix.

Clean valves and seats using something that loosens carbon, test again with cylinder head inverted on the bench, pour varsol into combustion chambers and see what happens. Large leakage will be obvious. Tiny seepage is ok. You can see which valve is leaking by drying it out and pouring varsol into the port with the head suitably angled.

Any cylinder head needing rework or new valves or new guides goes to the experts. Needs tools and expertise that I don't have.
I did a leak-down test prior to disassembling. There was leakage, but I am not sure how much. My compression test numbers were OK according to others on the internet. I was told by one of my motorcycle gurus that, since I had it apart, I should clean and lap the valves to ensure good compression and sealing since I have come this far. As far as I know, to do this I am going to be using some Prussian Blue, lapping compound and a lapping hand tool. To recut the valves and seats, I'd need to take it to a machine shop.

If you install new valves, or mix up which hole the valve came out of, you should get the seats ground.
Personally, if I had it this far apart, it would be getting a triple angle valve job and new seals.
If the bike is more than 15-20 years old it would be getting new guides and springs.

You may be able to lap that valve... by lapping it you "see" how flat the sealing surface is. we can't tell by looking at a internet jpg. we need to see them BEFORE you clean them with a wire brush
I bought new valve stem seals which I will install when everything goes back together. If I reuse the old valves, I was told to just lap and check for proper mating. If I do get new valves, I'd most likely take it in to a machine shop to have everything recut. I also have all the valves labeled so that I know where they came from. Hopefully this won't get mixed up.
 
Last edited:
You may be able to lap that valve... by lapping it you "see" how flat the sealing surface is. we can't tell by looking at a internet jpg. we need to see them BEFORE you clean them with a wire brush
I am using some Scotch-Brite hand pads to clean them. I also bought some brass wire brushes, but will probably use those to clean the ports on the head.

Here is what the valve looked like before using the Scotch-Brite, and just after scraping some of the bigger carbon deposits from the fillet area. The seating face wasn't yet touched in this photo. I was told that they look pretty bad. I do have 100,000 km on these valves.

IMG_2710e.jpg
 
I am using some Scotch-Brite hand pads to clean them. I also bought some brass wire brushes, but will probably use those to clean the ports on the head.

Here is what the valve looked like before using the Scotch-Brite, and just after scraping some of the bigger carbon deposits from the fillet area. The seating face wasn't yet touched in this photo. I was told that they look pretty bad. I do have 100,000 km on these valves.

View attachment 49743
I do not like that sealing surface at all. Actually surprised it ran.
 
Lap the head and cylinder sealing surfaces if you over heated it

That valve and seat NEEDS to be ground. It looks like a ridge at the edge there, what does the seat look like? if there is a ridge, it means it is not sealing, it's sitting on the ridge, not on the sealing surface, which allows blow-by, which make the engine run hot, which cakes any impurities in the fuel on the back of the valve... just like you got.
You can't lap that out.
Go see Gordie Bush and get him to do a triple angle valve job on his REALLY COOL Sunnen machine, resurface the head and jug, you can lap everything to save some coin and the top end will be good as new.
If you have 100,000k on this motor it WANTS guides and springs and at LEAST rings. These are all WEAR items that are designed to be replaced, they don't last forever. Did you measure the bore for square? A 100,000k motor is TIRED.

and DON'T be using scotch brite around the motor unless you plan on washing the motor out. Those things just throw abrasive everywhere.
The valve just above is the same as the valve in the image in my first post. I guess there was just a lot of carbon built up on it. I was getting some leakage when I tested it. Should I take that valve and have it and the seats cut, or just replace the valve and have the seat but to the new one? I'll have a look a t the seats. I haven't had a really close look at them since I haven't even started on the head yet.

The bike didn't overheat, but it was running hotter than usual.

I do not have a bore gauge so didn't measure the bore. I phoned my friend's friend's shop to have them do this work, but they were busy with getting bikes ready for riding season and said that it was a winter job. Who's Gordie Bush?

I did buy new valve stem seals and piston rings, but not springs or guides.

I've heard that about not using Scotch-Brite on the motor. I have some brass wire wheels that fit in a Dremel and some plastic razorblades for scraping surfaces.
 
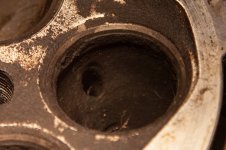
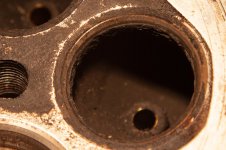
Here are one of the head's exhaust ports and seats. They're pretty gunked-up, but the seats look OK to me, although I don't exactly have a trained eye.

IMG_2714e.jpg


IMG_2715.jpg
 
What's the budget and plan for this project? Now that you are completely apart, I would get the head hot tanked, crack tested and probably milled flat. I'd have a chat with someone like Bush as he has infinitely more experience. I suspect he can give you a ballpark price for "here's my dirty head, valves and guides, do what you think should be done".
 
I'm probably going to do that.

Budget is somewhat limited. I went back to school last September and I don't finish until next April, and rent ain't cheap these days, but this is the year that I finally have time to get this done, so, if I need to spend more money I will somehow have to. I've already spent about $650 on gaskets, piston rings, and some other parts. KTM **** is a bit expensive. I am also going to replace my cooling system hoses and clamps, which will be another $200+, and I have to replace my sides stand ($125) and clutch lever ($75) that were damaged while U-Hauling the bike back from New Orleans (once I hit Michigan the roads were full of pot holes). Four new exhaust valves, if necessary, will cost $320 + tax, and four new intake vales are over $200 + tax. Then, if needed, there are labour costs if I take it to a shop, which I am expecting not to be cheap. But I definitely think I am going to talk to someone at a shop, see what they think and maybe get a quote.

The things I'd like a machine shop to do/check are:
  • clean heads
  • check the bore measurements
  • check surfaces and resurface, if necessary
  • cut valves and seats
I'm going to look into it after the long weekend likely. I need to get my baby back on the road.
 
I usually clean valves on the wire wheel. Any good reason not to?
 
I usually clean valves on the wire wheel. Any good reason not to?
I've been told not to use anything too abrasive. I don't have a bench grinder, but I do have some brash wire bushes that I can put in a Dremel. In most YouTube videos, they were either using a wire wheel on a bench grinder or Scotch-Brite, which is what I have been using. I'm not really sure what "too abrasive" means or what the measure of too abrasive is.
 

Back
Top Bottom