what r u paying for weed these days ?

There's a VERY good Facebook group called Ontario Grows. A friend of mine in Barrie runs it. There are a lot of very helpful people in the group that will share all kinds of tips from living soil to pest control. I suggest you check it out no matter your experience, and especially if you are new to growing. It has a heavy focus on weed, but also has a lot of gardening enthusiasts.

 
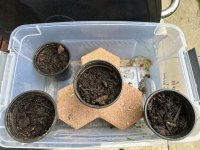
I found some seeds given to me by a great GTAMer. They're outside daily from about 9am to 7Pm or so to prevent any freezing issues.

Hopefully they take. 4 plants started.
 
I found some seeds given to me by a great GTAMer. They're outside daily from about 9am to 7Pm or so to prevent any freezing issues.

Hopefully they take. 4 plants started.
When it comes to frost, I learned that temperature on weather sites are taken at 4 feet above ground level. Also, temperature can drop up to -1ºC per vertical foot. So from the 4 foot mark, the temp could drop up to -4ºC. Frost happens at 0ºC. So as long as the weather forecast calls for 5ºC or higher, you don't need to worry about frost. If you, wisely, don't trust the forecasts 100%, all you need to do is cover the seeding with a margarine dish, or a bucket, depending on it's size, although since yours are in pots, you can leave them outside as long as the temp is forecast to be 5ºC or higher.
 
When it comes to frost, I learned that temperature on weather sites are taken at 4 feet above ground level. Also, temperature can drop up to -1ºC per vertical foot. So from the 4 foot mark, the temp could drop up to -4ºC. Frost happens at 0ºC. So as long as the weather forecast calls for 5ºC or higher, you don't need to worry about frost. If you, wisely, don't trust the forecasts 100%, all you need to do is cover the seeding with a margarine dish, or a bucket, depending on it's size, although since yours are in pots, you can leave them outside as long as the temp is forecast to be 5ºC or higher.
They’re about 4ft off the ground in separate containers…should be good all this week as forecast temps are all +5C the rest of this week.

Might hide them tonight just in case. Also placing them in the yard space that has close to 8-10hrs of sunlight.

1746485883949.jpeg
 
They’re about 4ft off the ground in separate containers…should be good all this week as forecast temps are all +5C the rest of this week.

Might hide them tonight just in case. Also placing them in the yard space that has close to 8-10hrs of sunlight.

View attachment 73923
Container on the ground and an old towel thrown over the top and it is hard to get anything inside the towel to freeze as the heat radiates up from the ground. Even with my raised herb bed, the towel trick survives a lot of frost.
 
Last edited:
Gonna try growing some plants this year. A few questions:
1- how far apart for individual plants?
2-how far away from a fence or house wall?
3-will they leave any kind of residue on said fence/wall?

Edit: One more. If I grow in a pot, how big should it be?
 
Last edited:
Should I be asking in the gardening section??
 
Gonna try growing some plants this year. A few questions:
1- how far apart for individual plants?
Feminized. 5’ minimum. They will grow up to 10’ tall if I pruned, and 5’ across.

Auto flower 2’.
2-how far away from a fence or house wall?
5’. The need good air circulation and full sun.
3-will they leave any kind of residue on said fence/wall?
No. But there will be considerable fragrance that will be noticible up to 100’ from a mature plant.

Auto flower plants are not as fragrant. You won’t smell them.
Edit: One more. If I grow in a pot, how big should it be?
Feminized. Plant them in the ground.

Auto flower are great in pots. They need minimum 12” diameter and 12 tall pot.

Photo plants (feminized seed) grow much larger, take longer to mature but yield 5x or more. Auto flower are simpler to grow, mature faster and are more compact and grow well in pots (so you can move them)
 
Should I be asking in the gardening section??
If you don't mind a little work, dig out an 18" diameter by 18" deep hole for each plant. Start them in 5 gallon buckets (preferably food grade) till there get a couple feet tall. Drill 1/8 holes all over the bucket for drainage, sides and bottom. When the plants reach about two feet tall, transfer them to the ground into the 18" holes and use a good triple mix, compost, or other rich soil to fill in the hole, not the dirt you removed. There's a fungus that helps the roots' health, mycorrhizal. Mix a little of this into the dirt, and sprinkle a handful in the hole before placing the plant in it.
That alone will greatly improve your plant's health and yield.

Another important tip, after harvest, do a bud wash. It removes dirt and bugs from the buds. You've seen the water spots on your car after the rain dries. Imagine that all summer long without washing your car. That's what's on the buds come harvest time. It makes the smoke a little harsh, and any oil would be dirty as well. And you wont believe the aphids that come out in the wash that you didn't even know were there! The wash will make the smoke much smoother, if you smoke it, and the edibles will taste better.

You can find the instructions for a bud wash online, but if I can find mine, I'll share it here for you.

My best advice, though, is join that group on Facebook (I hate Facebook and only use it for Marketplace, but this group was a HUGE help while I was growing). It's called Ontario Grows. I posted a link in this thread already.
 

What you'll need to wash buds:​

  • Three buckets (ideally 20-litre but smaller is fine)
  • Clean water (filtered or reverse osmosis)
  • Lemon juice & Sodium Bicarbonate (for general cleaning)
    or
  • Hydrogen Peroxide 3% (for powdery mildew)
  • A drying line to hang the wet buds

Bud-washing, a step-by-step guide​

  1. Set up the three buckets in a suitable area for working, somewhere it won't matter if a bit of water gets spilt on the floor.
  2. Fill the first bucketwith water and add the cleaning agent of your choice.
    1. If you're using hydrogen peroxide, which is particularly good for removing powdery mildew spores, you should add between 10ml and 12.5ml of 3% hydrogen peroxide to each litre of clean water.
    2. If, on the other hand, you want to use lemon juice and bicarbonate of soda for general cleaning, add a teaspoon (5ml) of each for every litre of water in the first bucket.
  3. Fill the remaining two buckets with pure, clean water.
  4. Prepare your plant by removing all the fan leaves and smaller leaves without resin. There's no need to wash the big leaves unless you plan to make raw cannabis juice with them or want to use them to make your own cannagars. If the bucket is too small to wash an entire plant, cut off individual branches that will fit comfortably so you can wash them one at a time.
  5. Dip the flower in the first bucket, Take the branch and, holding the end furthest from the tip, gently swirl and swish the branch from side to side to aid in cleaning. Around 30 seconds should be long enough. Remove it from the cleaning solution and allow the excess liquid to drip back into the same bucket.
  6. Dip it in the second bucket holding clean water. Gently move the branch around in the water for about half a minute, just like you did in the first bucket. Remove and allow the excess to drain.
  7. Plunge the branch into the third bucket, agitating gently once again so that the clean water can remove any remaining residue or cleaning solution. Remove the branch from the water after 30 seconds, drip dry and shake gently to shed most of the moisture.
  8. Hang the wet buds on a drying line in a well-ventilated space and follow the correct drying and curing procedure as detailed in our post on drying and curing marijuana buds. Because the flowers will be holding more moisture than usual, it's important to keep a close eye on them as they dry, particularly during the first few days. It's a good idea to use an extra fan or two to ensure good air movement within the drying space, and if your budget allows for it, a dehumidifier can make all the difference to the drying process, especially in humid climates.

That is a hell of a way to turn decent bud into bud lite.
Stalked trichomes don't fare too well with that sort of treatment.
Improper handling ,drying and curing turns a awful amount of otherwise fine product into absolute trash.
 
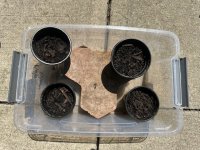
Well this is disappointing….4 seeds and zero results in a weeks time…

1747077375564.jpeg
 
No doubt some samples are in order for independent testing......
I tested my buds after the bud wash, but I don't have a control.
I wanted to know how much CBD was in my Caribbean Mystery, since that's what I was after, not THC.
It was 12% CBD and 16% THC.

The bud wash uses no harsh chemicals or agitation. It's also recommended by most professionals. You can see that from browsing the many grow sites.
Lemon juice PH 2 to 3
Baking soda PH 9
If you think that a rinse with products with products like above does not have negative effects on your flowers go for it.
Around here the biggest proponents of the wash are middle aged gals that could spend a afternoon explaining to you the benefits of various crystals.
 
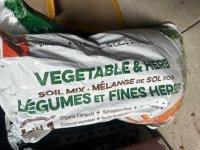
Out of curiosity what medium are you using?
This stuff…

1747164411611.jpeg

The seeds could be dead as they were in hiding for 1.5-2 years almost in the garage.

Not sure how long seeds are good for. I’ve got a bunch more from the same batch so may try in another soil mix but it’s getting late in the season to start growing.
 
Back
Top Bottom