Stuck swingarm pivot bolt | GTAMotorcycle.com

Stuck swingarm pivot bolt

Priller

Well-known member
So having bought an old RC51 for trackday fun, I inevitably started looking at the threads on RC51 forums for 'cheap' upgrades. One that came up was swapping the '00-01 swingarm (SP-1) for the longer and lighter '02-05 (SP-2) unit. I found one in decent nick for a good price, and figured, 'how hard can this be?' Famous last words...

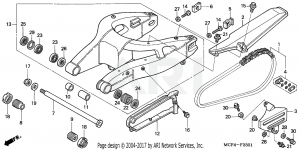
After figuring out the specialty tools, I popped off the nut (part 17 on the fiche below). First warning, as it had a fair bit of corrosion and took a good pull to break free. After that, I loosened the adjuster nuts (parts 18, look like castle nuts) and went to spin out the pivot bolt itself (part 7). The bolt did eventually come free, but it took a 24" breaker bar with an extension to get it shifted. I spun it out slowly, spinning it back in periodically to help clear as much of the corrosion as possible. It took force all the way out, and never came fully free. Towards the end of the threading, it started taking the swingarm with it, so that as I turned the bolt, I'd have to pull the swingarm back down to carry on. It also got much harder to turn at this point. I should also mention that I had hammered on the opposite end of the bolt at various points, and used liberal amounts of Liquid Wrench, neither of which seemed to make any difference.

The problem I have now is that the threading on the adjustment nut (part 9) is out of the frame, and the swingarm bolt just spins, but it just won't come free. I've tried whacking it with a 2 1/2" lb mini sledge, and put an air chisel into a socket adaptor to try to rattle it free, but no luck.

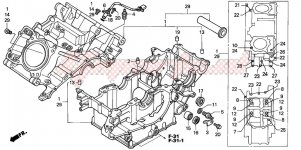
The bolt should just come free once the nut is off, as it's not actually threaded into anything, but it's stuck solid. It's spinning (with resistance) and the swingarm itself moves freely. This leads me to think I have threaded the sleeve (part 29 in the second fiche) out of the crankcase (and possibly crushed some bearings in the process, hence the rotating swingarm) but that the two are fused together.

The next obvious step is to get a much bigger hammer and just add brute force to try and pop the bugger free by whacking on the opposite end (right side). I'm not fussed about any of the parts except for the frame and crankcase, as I have different ones for the replacement swingarm. My main concern is possibly damaging the frame, though, and I was wondering if anyone had a more subtle solution? I'm quite concerned that I've already stripped the outside few threads when the adjuster nut (part 9) spun as it got to the end of the frame. The bike is also up on jack stands, so I'll have to figure out additional support before I really start to go to town.

One other note: I've also supported the engine, just in case the case isn't aligned and is binding. This had made no difference...

Here's a pic of the bolt end (parts 7 & 9 - not my bike, but it looks similar, bar the rusty rearset bolt):
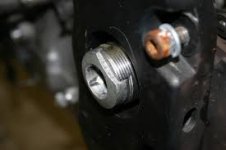
images.jpeg

And a fiche for the swingarm:

image.png

A fiche for the case:

honda-motorcycle-2000-vtr1000sp-rc51-crankcase.jpg

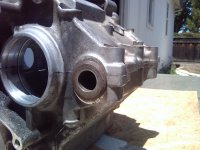
And a pic of the steel sleeve in a removed case:
Clipboard-1.jpg
 
i would be real carful not to crack the case, spray a lot of quality penetrating oil on it and let it set for a night
 
The sleeve has moved, as I've managed to get the full threaded part out of the frame (about an inch), so it's not seized to the case. It's also only flanged on the left side, towards where I'm trying to shift the bolt. If I had to guess, the sleeve is corroded to the bolt, it's moved with the bolt as I've spun it in the threads, and now it's pressing against the spacers and bearings in the swingarm.

One important piece to add: If I look on the left side of the case, there's a small gap to the swingarm where I can see what I think is the sleeve. It spins when I spin the bolt...

As for penetrating oil, I've used almost a full can of Liquid Wrench on the bastard over the last few days, hoping for a miracle 'pop', but no dice...
 
A few things to check:

Did you loosen the engine mounting bolts? They probably need to be loose so the engine tophat (29) doesn't bind the axle.

Is the engine weighing on the axle? Try jacking a bit under the part of the case that holds the tophat and axle.

7 (axle) or tophat (29) may be eccentric now from wear or pounding -- the may both need to be replaced. To get it apart, I'd put an air gun on the end of 7 and spin it for a minute or so. That may free it up enough to hap it back a little. Repeat.
 
One important piece to add: If I look on the left side of the case, there's a small gap to the swingarm where I can see what I think is the sleeve. It spins when I spin the bolt...
 
A few things to check:

Did you loosen the engine mounting bolts? They probably need to be loose so the engine tophat (29) doesn't bind the axle.

Is the engine weighing on the axle? Try jacking a bit under the part of the case that holds the tophat and axle.

7 (axle) or tophat (29) may be eccentric now from wear or pounding -- the may both need to be replaced. To get it apart, I'd put an air gun on the end of 7 and spin it for a minute or so. That may free it up enough to hap it back a little. Repeat.

I have loosened 6 of 8 engine mounting bolts (two on the left side and four on the right), as two have a similar locking nut to part 18, but much smaller, that I don't have a tool for. I haven't jacked the motor, but I have slid a 2x4 tight under the pan and then driven shims in tight to take the load...
 
what is 24 and 26? are they grease seals
 
Last edited:
I have loosened 6 of 8 engine mounting bolts (two on the left side and four on the right), as two have a similar locking nut to part 18, but much smaller, that I don't have a tool for. I haven't jacked the motor, but I have slid a 2x4 tight under the pan and then driven shims in tight to take the load...
It's probably time for brute force on the axle bolt. if it's dimpled on the thread end, try using a drift punch to you don't peen over the threads.
 
It's probably time for brute force on the axle bolt. if it's dimpled on the thread end, try using a drift punch to you don't peen over the threads.
Yeah, I that's what I was afraid of. Just wanted to consider all my options before swinging the big hammer. A 3/8" socket fits nicely inside the bolt, so I'll have to sacrifice an impact extension as a driver, as the end of the bolt is already almost flush with the frame...
 
what happens if you drive it back in and out a few times and see if it loosens up
 
what happens if you drive it back in and out a few times and see if it loosens up
Not an option at this point because the threaded collar on the left side is out but still tight to the frame. I'm pretty sure I've stripped the last thread or two, because I can't get it to thread back in, but either way, it's a one way trip, now. If I can get the bolt to shift at all, I may have to work it back and forth to break down the corrosion, but for now I'll be happy just to see it move at all...
 
Do you have an air hammer? A little easier on things and less likely to slip and ding the frame if you do.
 
Do you have an air hammer? A little easier on things and less likely to slip and ding the frame if you do.
I do, but it's just a cheapo Campbell Hausfeld little guy. It's done nothing. Might be worth returning to if I can get it to shift a little, as it'll be a lot easier to control...
 
Your regulator should be set to100PSI min (those little chisels will take more but don't push your luck). Try opening the air valve on the chisel, it will hit harder - even a little CH chisel packs a punch if you have it set right.
 
What i did on my bike was I tapped the swing arm pivot and inserted a threaded steel rod. Then i put an over sized socket over the threaded rod. Screw down a nut on the threaded rod and start tightening the nut. The socket will be pushing back against the frame of the bike so protect it. You will have to weld a nut on the end of the rod or double nut to counter the fact that the pivot is rotating. You are really only looking to move it a 1/4"-1/2", breaking the seized point. I found this to work better than wacking it and hitting it with power tools.

GL
 
Last edited:
Your regulator should be set to100PSI min (those little chisels will take more but don't push your luck). Try opening the air valve on the chisel, it will hit harder - even a little CH chisel packs a punch if you have it set right.
Big hoses and high flow fittings make a large difference too. Using at the end of 100' 1/4 hose will sound like it's working but have no grunt.
 
Just some observations that may or may not help:
Assembly #13 includes the swingarm and bearings, when they show it as an entire assembly like that it often means you can buy it as a complete assembly, so It likely comes out as one assembly too.

The threaded collars 8&9 combined with the castle nuts 18 are used to position your swingarm laterally in the frame. The only way they can do that is by positioning the 2 roller bearings part23.

The chain side has a needle bearing and that is not designed to take any thrust load at all. Part #11 appears to be the inner race for the needle bearing and if your bike is all rust inside there, that needle bearing will be done soon after it has water in it instead of grease. If the swingarm pivots when you turn the swingarm axle bolt, that needle bearing is your most likely culprit, part #11 might be seized on the axle bolt part #7 and the needle bearing would need to be all jammed up inside to do that, otherwise the swingarm would rotate on the axle.

... are you seeing any rust in there?
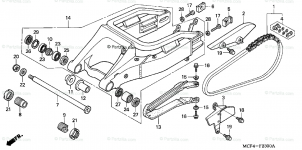
I think the fiche I previously posted wasn't correct. Here's one that lines up better, including having the cuts in the flange of the pivot bolt lock into cuts on the left side adjusting bolt:

SP-1 Swingarm parts.png
As per the Honda parts descriptions, the only needle bearing is part 24. 11 and 12 are listed as 'pivot distancing collars', and 23 are ball bearings. What I don't know is whether the flange on part 12 is larger than the swingarm opening to hold parts 27 and 24. If not, I may have crushed needle bearing 24, either because part 12 is seized to the bolt, or because part 29 from the case fiche (case sleeve) is seized, and the force of the pivot adjusting bolt (PART 9) being threaded out pulled them into that part of the swingarm. Either way, I'm not that fussed about those parts, all I care about is the frame and the case...

The swingarm rotated freely all the way until the last 1/8" or so of part 9 being threaded out. At that last bit, the turning got a lot harder, and the swingarm got tight with the bolt, so that removal involved turning the bolt and the swingarm would hit the undertail as it rotated, pull the swingarm down (bolt stayed), and repeat. The swingarm moves freely as it stands now, it was just something pinching as the bolt got threaded out.

So far, the only visible rust has been on the other side, on the nut (20), washer (22) and bolt (7) protruded from the frame. The rust was where all three met, and wasn't visible until the nut was removed.
 
I think the fiche I previously posted wasn't correct.
... sorta wondered about that.

Part#12 is definitely your needle bearing inner race as well as being a spacer.
Part#10 on the latest drawing is very curious, it appears to be drawn as a threaded collar, but there is no corresponding thread hole for that to mate with :unsure: unless part#11 is threaded on the inside, and that still does not make a lot of sense.
 

Back
Top Bottom