
|
|
|
You are using an out of date browser. It may not display this or other websites correctly.
You should upgrade or use an alternative browser.
You should upgrade or use an alternative browser.
FZR400 winter overhaul
- Thread starter Brian P
- Start date
gammaguy21
Well-known member
:lmao:Seriously Brian, buy a new tape measure.
Seriously Brian, buy a new tape measure.
LOL I have one but there is a "good" clean set of tools and another set for getting beat up and working on dirty jobs, and taking this apart is a dirty job!
I found the other top-out spring in the bottom of the fork leg, both sides are indeed set up the same.
Had some time today to fabricate a shock reservoir mount, and add another threaded hole in the location where the more modern voltage regulator is going to need it (helps to have already done one of these) but no pics, my ugly welding is nothing to brag about, all this stuff will end up getting covered up so it doesn't really matter in the long term.
Found an interesting previous-owner mod after cleaning years of dirt off the inside of the frame ... these bikes are supposed to have a 90-degree bracket for the lower rear engine mount that attaches sideways through the engine mount and is bolted vertically to a frame cross-member, but it has been welded solid. Not sure what they were thinking; doing that won't help frame stiffness but also now it won't allow the engine to be bolted up without static stresses on the frame if the width of the engine isn't dead-nuts accurate ... and if the crankcases are out-of-tolerance on the wide side, they won't fit. Can't really do anything about it but this is something better left the way it was originally designed.

fugue
Well-known member
Always wondered when you were going to resuscitate this bike. I'm also sure it will be done before I get my B bike half-done!
Thanks for the trivia about the lower engine mount - I always wondered why they did it that way.
The upgraded R/R is excellent, btw - I did both of mine and 14.4V at the battery all day long makes a huge difference, lithium or not.
Thanks for the trivia about the lower engine mount - I always wondered why they did it that way.
The upgraded R/R is excellent, btw - I did both of mine and 14.4V at the battery all day long makes a huge difference, lithium or not.
Season has not ended yet and you are already into stripping a bike .... no wonder that by end of Dec you report all work to be completed and your bikes are ready to roll for the next season, while I have not even started ... LOL
Does that magneto look like seriously rusted on of the pictures ... or it's my eyes getting fooled by some other discoloration?
Does that magneto look like seriously rusted on of the pictures ... or it's my eyes getting fooled by some other discoloration?
Yes, the flywheel is rust-coloured. Not enough to impair function ...
Today's project consisted only of delivering a bunch of stuff to Reflections Auto Refinishing in Niagara Falls, and cleaning up the shop. There is one main disassembly project remaining ... the engine. At that point, the bike will reach the point of maximum disassembly, so it's all good from that point on!
Today's project consisted only of delivering a bunch of stuff to Reflections Auto Refinishing in Niagara Falls, and cleaning up the shop. There is one main disassembly project remaining ... the engine. At that point, the bike will reach the point of maximum disassembly, so it's all good from that point on!
Nothing worth taking a picture of lately.
Yesterday's task was to clean the worst of the accumulated grease and dirt off the engine.
Today's task was ordering parts.
From Bluestreak:
Woodcraft clip-on handlebars (to replace the stock bent handlebars, and they're lighter)
New grips (badly needed)
New ignition wires and spark plug caps
Race Tech 0.95 kg/mm straight rate fork springs
Race Tech "emulator" compression damping valve kit
New guide bushings for the forks, also from Race Tech
Motul 20 wt fork oil
I already had the seals and dust caps. End result of this is that the front end should be set up identically to my race bike.
From random sources found on the internet:
Shindengen FH020AA mosfet voltage regulator from www.roadstercycle.com - I have one of these already on my race bike. Bye bye unreliable stock voltage regulator. And these have the correct charging voltage for a lithium battery - unlike the weak stock regulator.
And I scored a complete gasket kit for the engine, which I know I'm going to need.
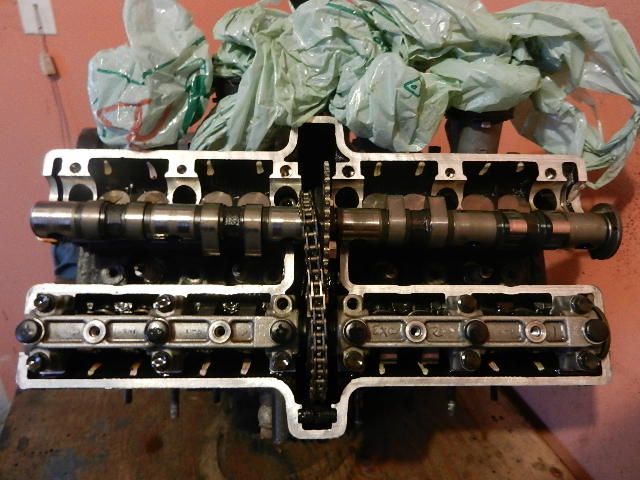
Today's starting point:

At this point, everything that connects the upper and lower crankcases comes off, plus the oil pump, clutch, tensioner for the timing chain, then the cam caps and camshafts (which appear to be in good shape). The camshafts come out easiest with least risk of breaking them (they are brittle!) if you undo the fasteners adjacent to lobes that are not pressing down first:
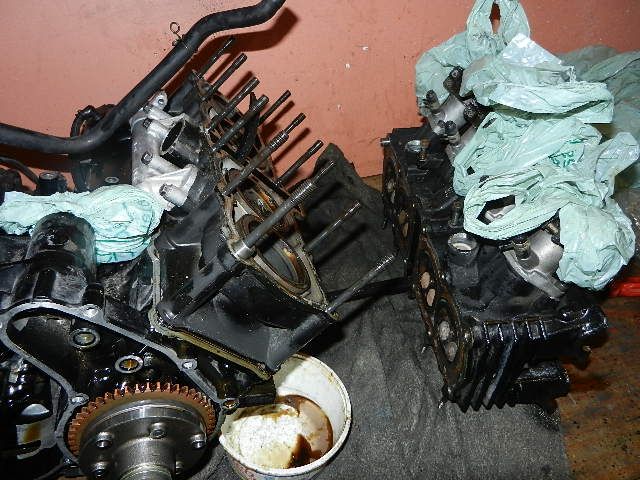
With careful prying on points that are designed into the block and head specifically for this purpose, the cylinder head comes off. I undo the nuts evenly in the reverse of the tightening pattern, first by cracking them all loose, then about halfway,then off, to minimize any chance of doing damage.
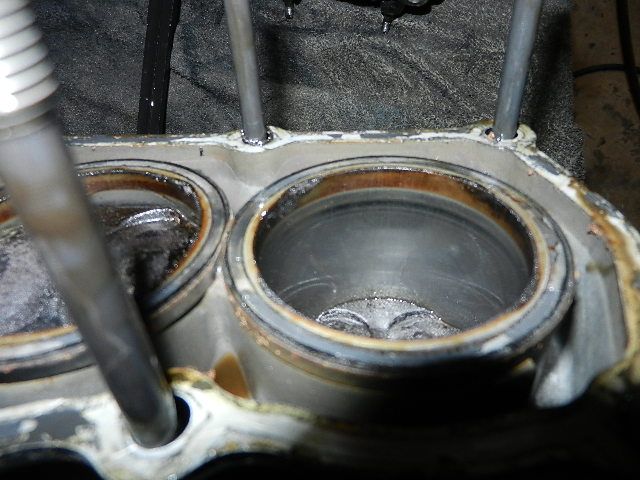
There's carbon build-up on the top of the pistons and above where the top ring stops, which is normal. The cylinder walls have minimal scuffing but most of the cross-hatch is worn smooth. And, we have an answer to a long-standing question ... This is a stock-bore (56mm) engine! I suspect that this "race engine build" consisted of hogging out the intake ports but nothing else. 'Splains why my other engine was stronger than this one.
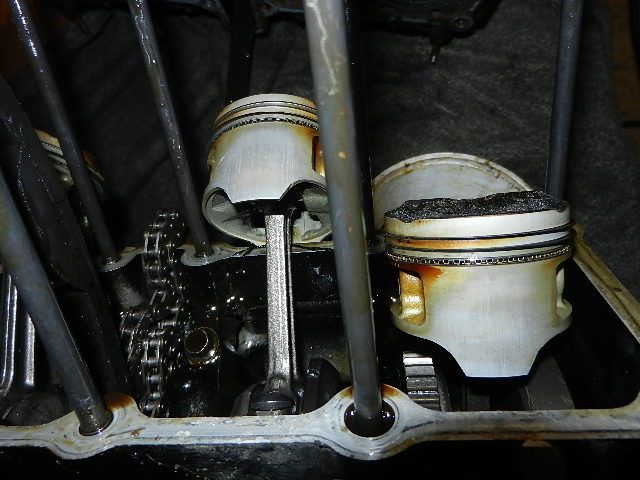
Now, the cylinder block pulls straight off, revealing stock pistons that are in very good shape, with practically no scuffing on the skirts. Good thing, since pistons for these engines are no longer available.
I have a funny feeling that no one has had the bottom end apart before, which means no one has dealt with the oil passage restrictor jets. I'll find out shortly.

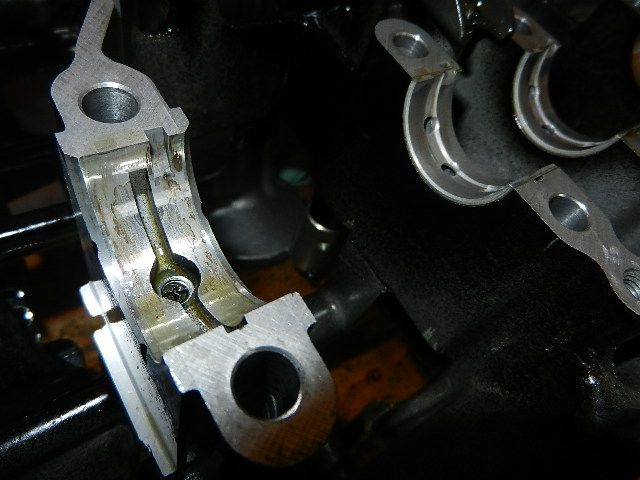
At this point, everything that connects the upper and lower crankcases comes off, plus the oil pump, clutch, tensioner for the timing chain, then the cam caps and camshafts (which appear to be in good shape). The camshafts come out easiest with least risk of breaking them (they are brittle!) if you undo the fasteners adjacent to lobes that are not pressing down first:

With careful prying on points that are designed into the block and head specifically for this purpose, the cylinder head comes off. I undo the nuts evenly in the reverse of the tightening pattern, first by cracking them all loose, then about halfway,then off, to minimize any chance of doing damage.

There's carbon build-up on the top of the pistons and above where the top ring stops, which is normal. The cylinder walls have minimal scuffing but most of the cross-hatch is worn smooth. And, we have an answer to a long-standing question ... This is a stock-bore (56mm) engine! I suspect that this "race engine build" consisted of hogging out the intake ports but nothing else. 'Splains why my other engine was stronger than this one.

Now, the cylinder block pulls straight off, revealing stock pistons that are in very good shape, with practically no scuffing on the skirts. Good thing, since pistons for these engines are no longer available.

I have a funny feeling that no one has had the bottom end apart before, which means no one has dealt with the oil passage restrictor jets. I'll find out shortly.
Removing upper crankcase bolts

Uh oh, what was that metallic click when flipping the engine over to remove the oil pan? ... hmmm, this would be a problem.
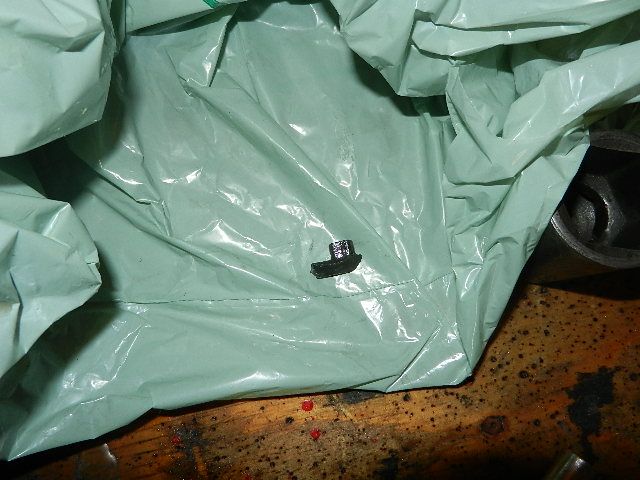
Here is where it came from.
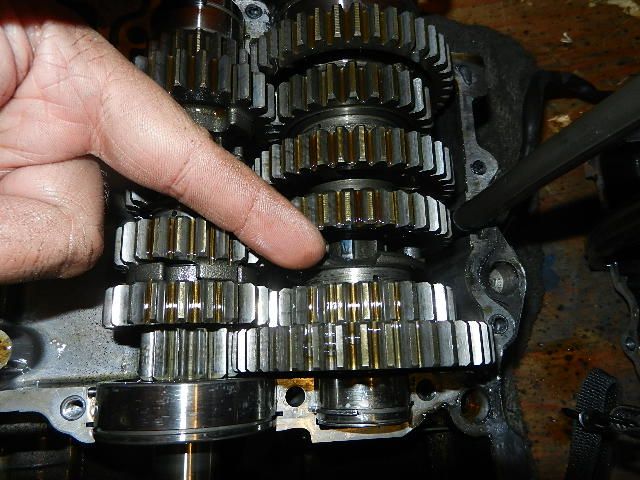
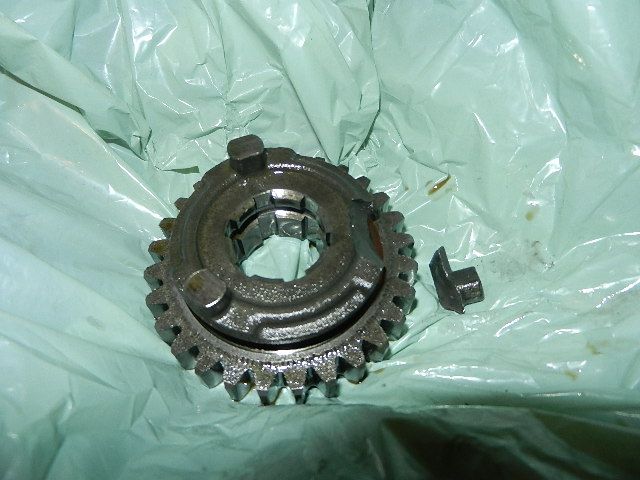
Been there, done that. It is a 4th-gear engagement dog. Same exact thing that broke on my race bike this past summer. Who knows how long ago this broke on this bike. In this case, the broken engagement dog must have escaped from the gear without doing any other damage, and the transmission kept going using the other two.
The broken piece fits perfectly ... so there are no other gear chunks floating around.

Uh oh, what was that metallic click when flipping the engine over to remove the oil pan? ... hmmm, this would be a problem.

Here is where it came from.

Been there, done that. It is a 4th-gear engagement dog. Same exact thing that broke on my race bike this past summer. Who knows how long ago this broke on this bike. In this case, the broken engagement dog must have escaped from the gear without doing any other damage, and the transmission kept going using the other two.
The broken piece fits perfectly ... so there are no other gear chunks floating around.

Last edited:
Backed-out restrictor jets!
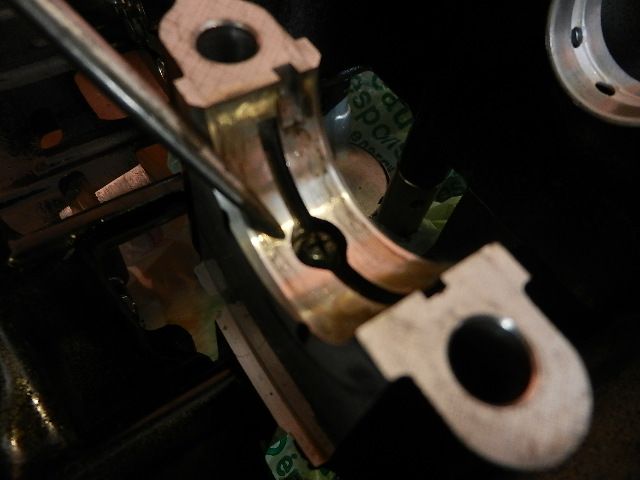
Loctited-in-place, bottomed out in the threads restrictor jets.
This is the nemesis of the FZR400 engines (and, apparently, the FZR250 engines). The one in the first photo was completely out of the threads just resting in place between the crankcase and the back of the bearing shell (removed in the photo). The only thing that saved the engine is that this is a street bike, and doesn't see extended periods of high revs.
The problem will not happen again.
I am now quite sure that this bottom end has never been apart before.

Loctited-in-place, bottomed out in the threads restrictor jets.

This is the nemesis of the FZR400 engines (and, apparently, the FZR250 engines). The one in the first photo was completely out of the threads just resting in place between the crankcase and the back of the bearing shell (removed in the photo). The only thing that saved the engine is that this is a street bike, and doesn't see extended periods of high revs.
The problem will not happen again.
I am now quite sure that this bottom end has never been apart before.
N3WMAN
Well-known member
Looks like a fair amount of carbon buildup on the piston. Is that a lot or pretty normal?
... will come, in due course!
I've been on the week-long business trip that will be paying for this little project, and I *just* got back from the airport, so obviously nothing has happened. In the meantime, a box showed up with a complete gasket kit for the engine, a couple other parts orders should be working their way through, and I need to send the rear shock out to get a new spring installed and a longer hose to the reservoir. Remember the shock line that blew at Deals Gap and Wheeler's fixed it in a hurry? That hose needs to get done properly - he used what he had in the shop, which was great, but it really needs to be a couple inches longer.
I've been on the week-long business trip that will be paying for this little project, and I *just* got back from the airport, so obviously nothing has happened. In the meantime, a box showed up with a complete gasket kit for the engine, a couple other parts orders should be working their way through, and I need to send the rear shock out to get a new spring installed and a longer hose to the reservoir. Remember the shock line that blew at Deals Gap and Wheeler's fixed it in a hurry? That hose needs to get done properly - he used what he had in the shop, which was great, but it really needs to be a couple inches longer.
|
|
|
|
|